Thursday, 28 February 2013
UV mapping for Daryl
As well as Adam, I also collaborated with Daryl and ended up doing UV mapping again in return, he did my rig for my Alien and in surprise the fact my alien was a quadruped didn't cause any difficulties as far as I'm aware. Again, if you're interested to see Daryl's work, you can find it by following this link.. http://darylssketchbook.blogspot.co.uk/
I did the UV mapping for both his spaceship and his alien and not going to lie, they were pretty difficult and ended up being very.... chopped up. This was mostly down to not-so-great topology which led me to separate a lot of body parts and also have to alter the model itself in terms of adding new edges to make things easier to cut and unwrap. Daryl's model's were very blocky which makes things easier for UV mapping but he had a lot of holes and also extra faces which were hidden making it hard to work on.
All in all though, I managed to work with what I had and got it done and like Adam, he also seemed happy with the work I had done for him. From what I could see with the finished models, the texturing came out really well so with that in mind I think I did a good job.
Labels:
alien,
collaboration,
models,
OUDF504,
UFO,
uv mapping
UV mapping for Adam
So as you know I collaborated with a few people Adam being one of them. And if you're interested to see his work you'll find it all on his blog on this address.. www.dfgalvl5blog.blogspot.com
Right, so in turn for him doing my concept art I did some UV mapping for him. Not sure if there's a wrong and right way to do UV mapping but as I talked to my peers, it seems no one likes doing it (except me) and that a lot of people used the auto mapping system. Although it's quick, it does leave your texturing a bit stretched here and there and knowing that I avoided using it and just unfolded everything manually. Don't get me wrong, it seems great for quite complicated pieces but you still need to move some UVs around so I just stuck to what I know best.
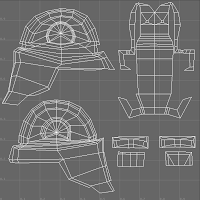
Adam's character was some kind of robot space mercenary so his physique was quite blocky. This was good news to me but there were a lot of intricate details in hard to reach places so, I had to do a lot of planar mapping for several parts of the body, mainly the sides of the head. All in all it did take longer than I hoped because after unfolding parts of the body the UVs ended up very messy so I had to do a lot of moving UVs around and essentially problem solving. Where I enjoy it, this UV map was took a while to iron out because there were a lot of edges very close together and they started to overlap one another after unfolding them.
Overall, I believe they were happy with my work and seemed pretty glad they didn't have to do it themselves. I'm just glad I have a skill set which people don't seem to enjoy very much. Means I could be doing a lot of collaborations in the future which suits me just fine.

Thursday, 21 February 2013
Double Negative
Double Negative otherwise known as DNeg, are one of Europes biggest providers for visual effects in the film industry. They've worked on some of the greatest films within the to this day such as the recent Bond movie Skyfall, The Dark Knight franchise as well as the famous Harry Potter series.
To my surprise.. although they're well renown for their skills in visual effects and have worked on a great line of movies in their time, they state that they "support an invest in low budget British-qualifying productions in the 2-10 million budget range." To me that seems a lot! And even then, looking at the end results of say the recent success of Skyfall, I wouldn't have thought that it was a low budget movie. However, what's considered "low budget" varies from country to country and it also varies depending on the genre of film which was an interesting thing to discover.
Back to DNeg..
I had the pleasure of sitting in some talks they did at the Bradford Animation festival and I can't believe how good they really are. The majority of their work is not noticeable in terms of, their visual effects look so real it's hard to notice the difference. They also mentioned that imperfection for them was key because that's what the real world is like. Sometimes you see some CGI and you can tell it's not real because it looks way to clean which is something they steer away from by using this principle.
Seems obvious but to find out that reference is key even within the industry makes me, as a student, feel like they're in good practice. The main source of reference for them was going out and taking photographs, whether it be cities or various materials, they spent a lot of time in the research department This is because, they specialise in visual effects, they create things that don't exist so they need a lot of references to work from and to help build a picture so they know what they're aiming for as the project continues.
To finish off, I managed to find a DNeg showreel showing some of the movies they've worked on. All in all, I'm really impressed with the titles they been a part of and I really stand by their principles in terms of good visual effects especially imperfection.
Monday, 11 February 2013
UFO Concept and Inspirations
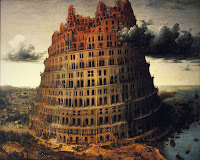
This is my concept art that I did for my UFO. Because I've gone for a stone golem alien if you will, I wanted the space ship to be fitting for such a creature. I used a lot of references for this space ship as far as inspiration goes. The main sources of inspiration were Aztec temples and the Tower of Babel.


I knew that I wanted the space ship and alien to relate to each other which is why I started researching temples and buildings in general. The Tower of Babel is by far the most interesting in terms of concept. The story goes that the structure was built to reach into the Heavens by humanity and shared one language, but the building was halted as God came and scattered them across the Earth so they could not return to one another. In a result of this, their languages were muddled thus bringing us to the world as it is today. In terms of the alien race, I'm going to use this concept to explain why they returned to the Earth and why they have a language barrier with humans.
Other inspirations for my ship were Tartarus for Persona 3 which is a complex mesh of buildings jammed together to create a labyrinth tower. I think that the nonsensical structure has been put together well and is fitting of an alien race because they're something outside of our knowledge and that we cannot begin to understand.

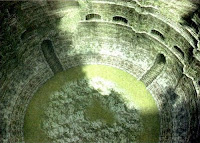
I have also referenced Shadow of the Colossus to keep an ongoing theme of inspiration throughout my project. The Coliseum arena where you fight the Gecko boss makes a nice point of reference because it's similar in structure to the Tower of Babel.
Friday, 8 February 2013
Filming
I found filming really fun but stressful at the same time. It took a long time to get started and some members of the group were in and out so we got a little lost with what we were doing. Some members of the group also came unprepared and started making things up as they went along which wasted a lot of time. Me and Rhys did push things on a lot and got everyone into gear so we could finish on time though.
As well as directing my own shots I also operated camera on the track and dolly. Seems my height was convenient for the low profile you had to be at for the camera. The track and dolly was fun and i'm really happy with some of the shots I got with it.
Directing was pretty fun because you're suddenly calling all the shots and have control over the scene. I'm getting use to a leading role because of past experience in groups and what not which made it a bit easier for me to handle. Tim was really great to work with and took instructions well.
Wednesday, 6 February 2013
Project Collaborations
After working in a group for the last module and working to our strengths, I used this knowledge to my advantage and have collaborated with the guys from my last project. Originally I didn't have anyone to collaborate with because I wasn't sure which skills I could trade with someone, so I was surprised when Adam asked something specific of me. Then I became aware of what my own strengths were and thought about what roles I did in the group which were UV mapping, animating and concept art.
So later on we got together and discussed what we wanted doing and what we would do in return. So, Adam has done my concept art and more recently helped me with my Alien model because I was struggling to do it myself. And Daryl Has now offered to do my rigging in exchange for UV mapping.
I think collaborating is really important and beneficial to any project because this work flow and process is similar to the way they would work in industry.
The film industry workflow is split into 5 different sections..
These different sectors are then split into smaller sections which are areas in which groups of people specialise in specific roles for example storyboarding. Taking this into account, the way me and my peers have split our roles, worked to our strengths and offered those to each other isn't all that different. We all specialise in different areas and have come together to work towards a final piece.
All in all, I think working with one another is really important and gives us just a little taste of what it'd be like in industry, managing and passing work around different sectors.
So later on we got together and discussed what we wanted doing and what we would do in return. So, Adam has done my concept art and more recently helped me with my Alien model because I was struggling to do it myself. And Daryl Has now offered to do my rigging in exchange for UV mapping.
I think collaborating is really important and beneficial to any project because this work flow and process is similar to the way they would work in industry.
The film industry workflow is split into 5 different sections..
- Development
- Pre-production
- Production
- Post-production
- Distribution
These different sectors are then split into smaller sections which are areas in which groups of people specialise in specific roles for example storyboarding. Taking this into account, the way me and my peers have split our roles, worked to our strengths and offered those to each other isn't all that different. We all specialise in different areas and have come together to work towards a final piece.
All in all, I think working with one another is really important and gives us just a little taste of what it'd be like in industry, managing and passing work around different sectors.
Realism tutorial by Lorland Chen
Found quite a nice tutorial in Imagine FX by a chinese artist called Lorland Chen and I thought i'd share it for anyone who's interested in concept art. Despite the fact I'm not too interested in the concept art side of things, It was still an interesting read in terms of workflow and software. It's also very inspirational~
Rather than sticking to one designated software she uses a combination of Photoshop and Paint Tool Sai which is quite interesting. She goes on to explain the benefits of exploring other software as well as going into detail about her work process for this amazing asian figure. There are also little bits and tips about work process, techniques and tools.
Subscribe to:
Comments (Atom)


